

Contents
On this page
Adyen Terminal - Plugixa POS for WooCommerce
Adyen Terminal lets the register take card payments on an Adyen payment terminal. The cashier sends the amount, the customer pays on the terminal, and the payment is added to the sale. Refunds go back to the same card through Adyen, without the card.
The screen’s own words: “Take card payments on Adyen terminals (V400m, S1F2, AMS1, P400 Plus) through the cloud Terminal API. Refunds go back to the card.” Your site talks to Adyen, and Adyen drives the terminal: no Adyen code runs in the browser, and there is no webhook to set up.
Open Plugixa POS > Adyen Terminal (in the Store group). The screen needs the right to manage the POS settings.
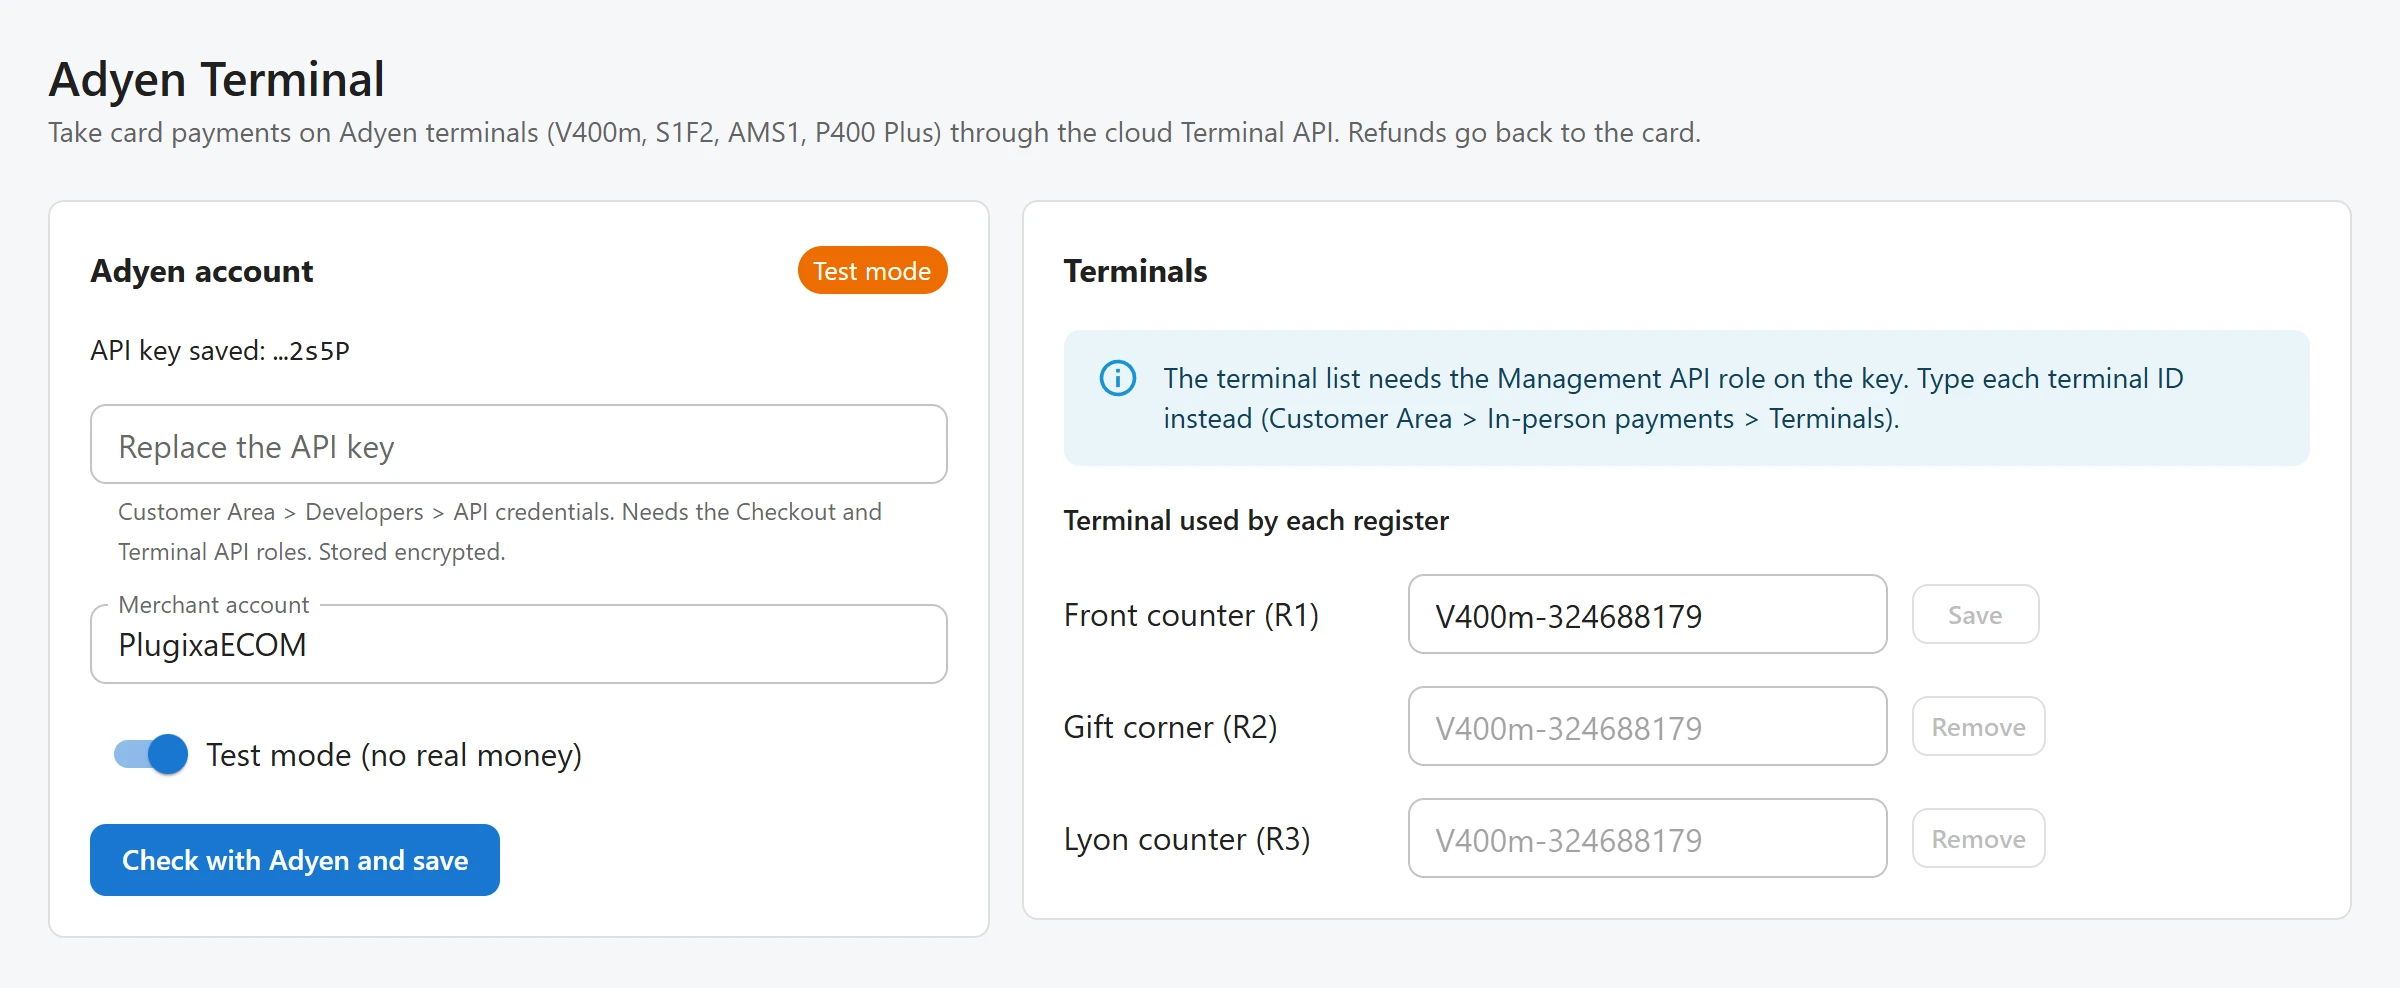
1. Save your Adyen account
In the Adyen account card:
| Field | Notes |
|---|---|
| API key | “Customer Area > Developers > API credentials. Needs the Checkout and Terminal API roles. Stored encrypted.” |
| Merchant account | The merchant account the terminals belong to. Letters, digits, _ and - only. |
| Test mode (no real money) | On by default. Turn it off to take real payments. |
| Terminal API region | Shown when test mode is off: Europe, United States, Australia or Asia Pacific SE. |
| Live URL prefix | Shown when test mode is off. “Developers > API URLs, e.g. 1797a841fbb37ca7-AdyenDemo.” Live mode cannot be saved without it. |
Click Check with Adyen and save. The plugin first asks Adyen to accept the key for that merchant account, so a typo is caught here and not at the first sale. A refused key shows “Adyen refused the API key (or it lacks the needed role).”
The key is stored encrypted and never sent back to the browser. Once saved, a badge shows Test mode or Live, API key saved shows only the last four characters, and the field becomes Replace the API key. Leave it empty to keep the saved key while you change the other fields.
2. Give each register a terminal
The Terminals card appears once the account is saved.
If the key also has the Management API role, the card lists the terminals of your merchant account with their status, and the terminal fields suggest them as you type. Without that role the card says “The terminal list needs the Management API role on the key. Type each terminal ID instead (Customer Area > In-person payments > Terminals).”
Under Terminal used by each register:
- Type the terminal ID next to the register. It is the model, a dash and the serial number, for
example
V400m-324688179. - Click Save on that line.
To take a terminal away from a register, empty its field and click Remove. A badly formed ID is refused with “A terminal ID looks like V400m-324688179 (model, dash, serial number).”
Taking a card payment
Once the account is saved, the register’s payment screen offers Card terminal (Adyen).
- Press Pay and choose Card terminal (Adyen). The Card payment dialog opens.
- Amount is the amount still due. Lower it to pay part of the sale by card and the rest another way.
- Click Send to the reader. The terminal shows the amount, and the dialog asks the customer to tap, insert or swipe their card.
- When Adyen reports the payment as approved, the dialog closes and the card payment is added to the sale with Adyen’s payment reference. Finish the sale as usual.
The register asks Adyen how the payment stands while it waits. What can happen:
| Message | Meaning |
|---|---|
| “The card was declined.” | The card was refused. Adyen’s reason follows in brackets when it gives one. Click Try again. |
| “The terminal never received the payment. Is it on and connected?” | A minute passed and the terminal had not picked up the payment. |
| “The terminal did not accept the payment. Is it on and connected?” | Adyen refused to send the payment to the terminal. |
| “The terminal charged a different amount. Check the payment in Adyen.” | The approved amount or currency differs from the one sent. The payment is not added to the sale. |
| “No card terminal is set for this register. Set one in Adyen Terminal settings.” | Give the register a terminal first. |
Cancel the payment sends a stop to the terminal. If the customer paid in that same moment, the payment is kept and added to the sale.
In test mode, pay with one of Adyen’s test cards on the terminal. The terminal works through your site, so it needs a connection.
What the site checks
When the sale is recorded, every Adyen payment on it must be one the site saw approved by Adyen, for exactly that amount and currency, and not already used by another sale. Otherwise the sale is refused with “The card payment has not gone through.”, “The card payment does not match the amount of the sale.” or “This card payment already pays another sale.”
Refunds
When you refund a sale paid on an Adyen terminal, choose the card terminal as the way to pay back. The plugin sends the refund to Adyen inside the refund itself: if Adyen does not accept the request (“Adyen did not accept the refund.”), the refund is not recorded. Adyen then processes the refund on its side. A sale that was not paid on an Adyen terminal cannot be refunded this way: “This sale was not paid on an Adyen terminal: choose another way to pay back.” See Refunds.
Related
Quick Links
Share