

Contents
Testimonial Requests - Plugixa Testimonial
Email-based system for requesting testimonials from customers. Admins send personalized emails with unique tokenized links; recipients click to submit via a pre-filled form.
Flow
- Admin creates a request in Plugixa Testimonial → Requests (single or bulk).
- Plugin generates a 48-character token and sends an HTML email via
wp_mail(). - Recipient clicks the submission link, which opens the submission form with name/email pre-filled.
- On form submission, the request status changes from
pendingtosubmittedand links to the newly created testimonial. - Expired requests (past
request_expiry_days) are auto-expired on list queries.
Setup
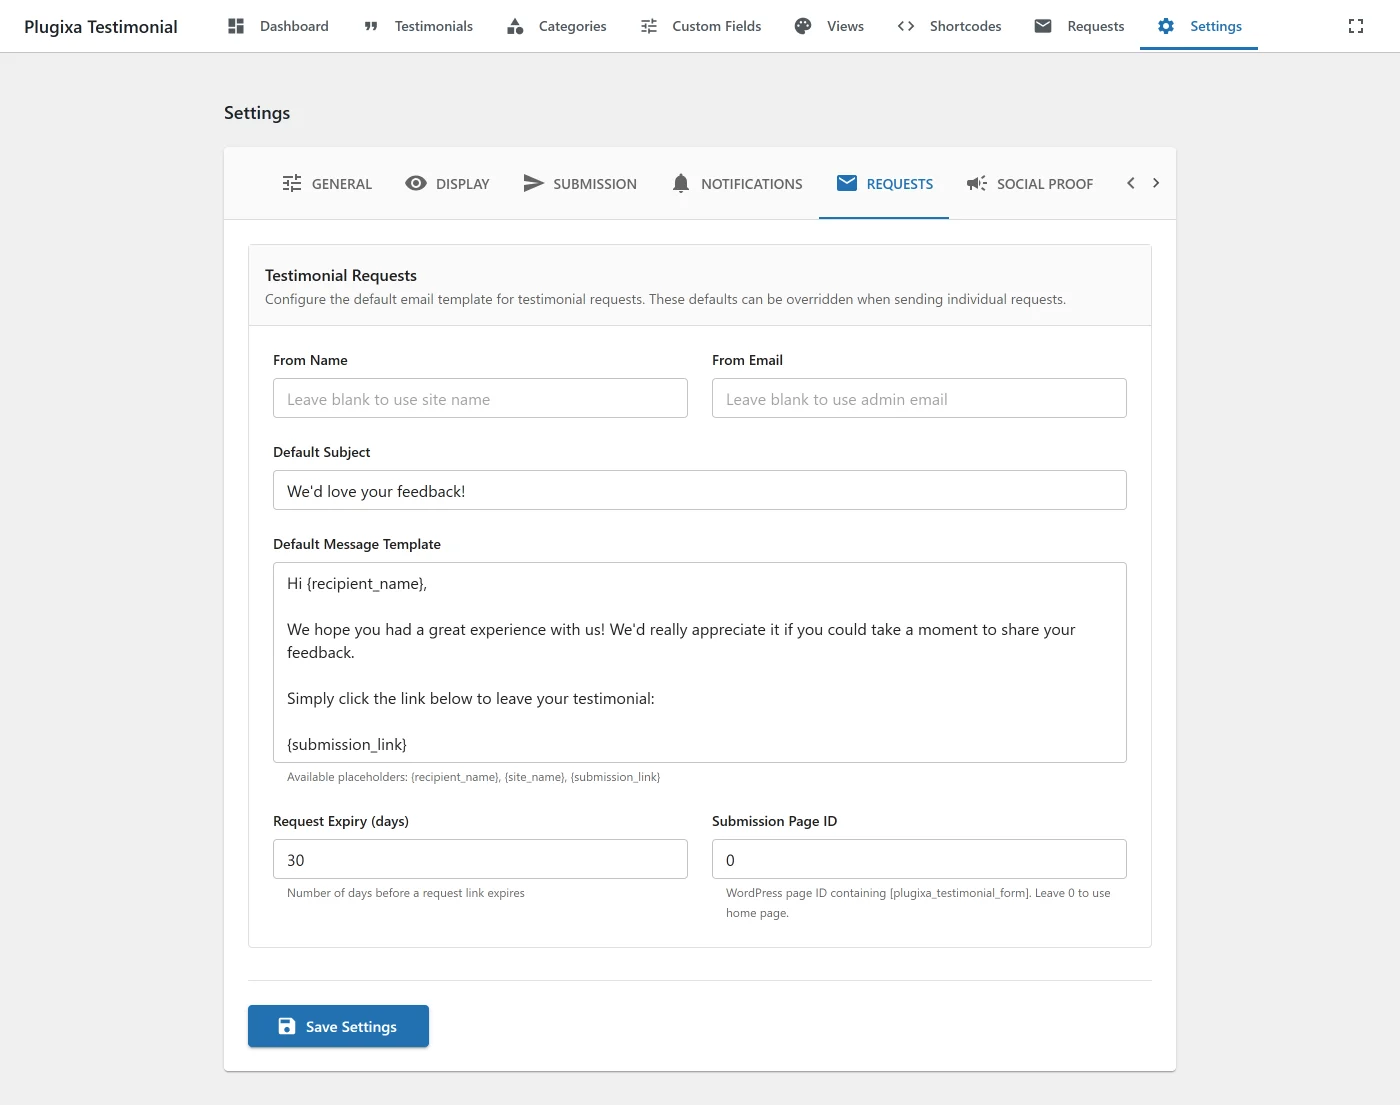
1 · Configure request defaults
Go to Plugixa Testimonial → Settings → Requests.
| Setting | Default | Notes |
|---|---|---|
| From name | (falls back to site name) | Email “From” display name. |
| From email | (falls back to admin email) | Email “From” address. |
| Subject | We'd love your feedback! |
Default email subject. |
| Message | (default template) | Default email body with placeholder substitutions. |
| Expiry (days) | 30 |
Days until the token expires. |
| Submission page | 0 (home URL) |
Page ID containing the [plugixa_testimonial_form] shortcode. |
2 · Create a submission page
Create a WordPress page (e.g., “Share Your Experience”) and add:
[plugixa_testimonial_form]
Then set the page as the Submission page in Settings → Requests. The tokenized link sends recipients to this page.
Placeholders
The email body supports these template variables:
| Placeholder | Value |
|---|---|
{recipient_name} |
Recipient display name. |
{site_name} |
get_bloginfo('name'). |
{submission_link} |
The full URL with the token query parameter. |
The plugin replaces a raw {submission_link} text with a styled CTA button for better click-through rates in HTML emails.
Sending a single request
- Go to Plugixa Testimonial → Requests → Add New.
- Select Single mode.
- Enter:
- Recipient email (required).
- Recipient name (optional, used in
{recipient_name}). - Subject (falls back to the default).
- Message (falls back to the default).
- Click Send.
The plugin generates a token, inserts the request row, and sends the email. A success snackbar confirms delivery.
Sending bulk requests
- Go to Plugixa Testimonial → Requests → Add New.
- Select Bulk mode.
- Paste or upload a list of email addresses (one per line, or
Name <email>format). - Customize the subject and message once - applied to all recipients.
- Click Send.
Each recipient gets their own token and row. The plugin processes them sequentially; failures are reported back in the result summary.
Request list page
Go to Plugixa Testimonial → Requests.
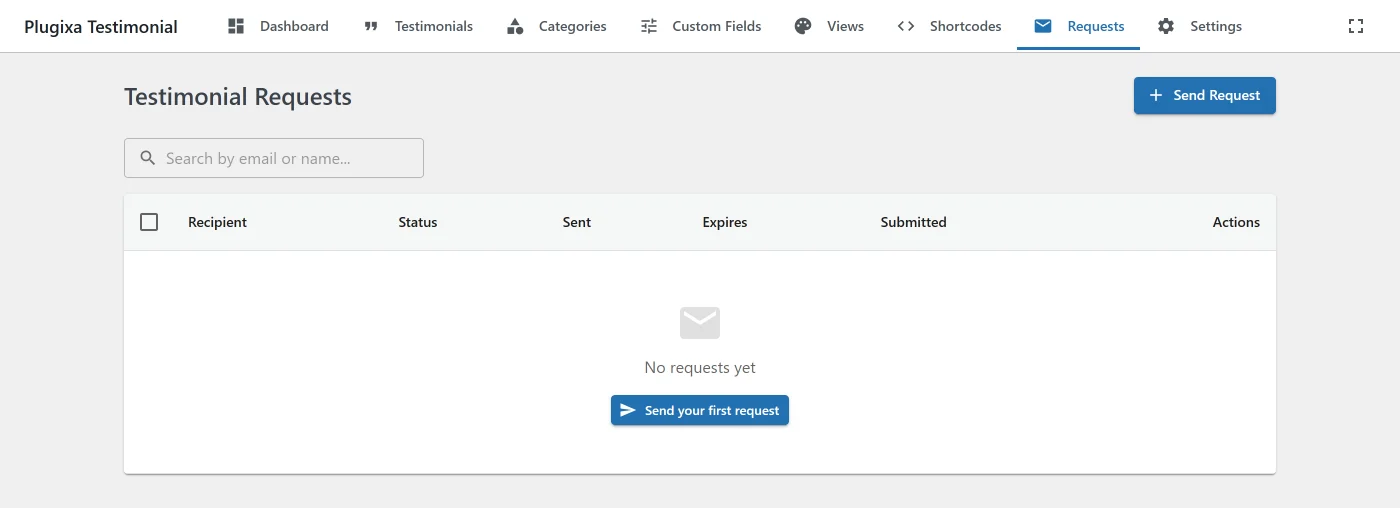
Columns:
- Recipient - name + email.
- Status -
pending/submitted/expired(color-coded chips). - Sent at - when the email was dispatched.
- Expires at - token expiry.
- Submitted at - when the testimonial was received.
- Testimonial - link to the created testimonial (if submitted).
Actions per row:
- Resend - refreshes the token expiry and re-sends the email (useful for nudges).
- Delete - permanently remove the request row.
Bulk actions:
- Bulk send - draft a fresh bulk run.
- Bulk delete - clean out obsolete rows.
Filters
- Search - by recipient email or name.
- Status - pending / submitted / expired.
Token system
Each request gets a 48-character random token (wp_generate_password(48, false)). The token is appended as ?pxt_request_token= query parameter to the submission page URL.
Token validation
The submission form detects the token in the URL, validates it via:
GET /wp-json/plugixatestimonial/v1/requests/validate-token?token={token}
Response (on valid token):
{
  "valid": true,
  "recipient_email": "[email protected]",
  "recipient_name": "Jane Doe",
  "expires_at": "2026-05-17T12:00:00Z"
}
The form pre-fills client_name and submitter_email from this response.
Token consumption
On successful form submission with a valid token:
- The created testimonial links back to the request (
testimonial_idFK on the request row). - The request status flips to
submitted. submitted_atis set toNOW().- Subsequent uses of the same token return
{ valid: false }to prevent duplicate submissions.
Email template
The HTML email uses an inline-CSS table-based layout for email-client compatibility:
- Header - branded indigo background with site name.
- Body - message with placeholder substitution.
- CTA button - replaces the plain-text submission link, indigo-styled.
- Footer - “Sent by {site_name}”.
Email rendering is consistent with the admin notification email style - both use the shared EmailNotifier::build_email_html() helper.
Email deliverability
Emails are sent using WordPress wp_mail(). If delivery is unreliable:
- Install an SMTP plugin (WP Mail SMTP, Fluent SMTP) to route through a dedicated provider.
- Configure SPF / DKIM / DMARC records for your domain.
- Test deliverability to multiple inboxes (Gmail, Outlook, company mail).
REST API
| Method | Endpoint | Description |
|---|---|---|
GET |
/wp-json/plugixatestimonial/v1/requests |
List (filters: search, status, page, per_page). |
POST |
/wp-json/plugixatestimonial/v1/requests |
Create + send email. |
GET |
/wp-json/plugixatestimonial/v1/requests/{id} |
Get one. |
DELETE |
/wp-json/plugixatestimonial/v1/requests/{id} |
Delete. |
POST |
/wp-json/plugixatestimonial/v1/requests/{id}/resend |
Resend (refreshes expiry). |
POST |
/wp-json/plugixatestimonial/v1/requests/bulk |
Bulk send to multiple recipients. |
DELETE |
/wp-json/plugixatestimonial/v1/requests/bulk-delete |
Bulk delete. |
GET |
/wp-json/plugixatestimonial/v1/requests/validate-token |
Public - validate a token and return recipient info. |
Admin endpoints require edit_posts. validate-token is public by design.
Auto-expiry
The plugin does not run a cron job for expiry. Instead:
- The Requests list query auto-marks rows as
expiredwhenexpires_at < NOW()andstatus = pending. - The
validate-tokenendpoint returns{ valid: false }for expired tokens.
This means old rows stay in the database until deleted manually (or via bulk delete). Tune request_expiry_days based on your business cycle.
Hooks
There are no testimonial request hooks. The plugin fires eight filters in total and no actions; see the Hooks Reference for the full list and what each one can change.
Troubleshooting
Emails not arriving
- Check your WordPress email configuration - install WP Mail Logging plugin to verify
wp_mail()is firing. - Check spam folders.
- Verify SPF/DKIM records for the sending domain.
Token returns “Invalid”
- The token has been consumed (testimonial already submitted).
- The token expired (past
expires_at). - The token was typed wrong - tokens are case-sensitive.
Bulk send seems to stall
- Bulk sends process one at a time to avoid rate limits. For 100+ recipients, be patient (up to a few minutes).
- Check the PHP max execution time - increase to 300s if needed.
Recipient gets multiple emails
- You sent the request multiple times. Use Resend from the list to nudge without creating a new row.
Related
- Submission Form - the form that handles tokenized submissions
- Settings → Requests - Requests tab configuration
- Testimonials Management
- Hooks Reference