

Contents
Submission Form - Plugixa Testimonial
Let visitors submit testimonials directly from your frontend. The form supports inline and modal display modes, per-field real-time validation, photo upload, custom fields (Pro), multilingual passthrough, and reCAPTCHA v2 or v3 protection.
Enabling the form
The form is disabled by default.
- Go to Plugixa Testimonial → Settings → Submission.
- Toggle Enable Submission Form on.
- Configure required fields, reCAPTCHA, and photo upload.
- Save.
When disabled, [plugixa_testimonial_form] renders nothing on the frontend.
![The Submission tab of Settings. Enable Submission Form sits above a reminder of the [plugixa_testimonial_form] shortcode. Form Configuration chooses between Inline and Modal / Popup - “Inline renders the form directly on the page. Modal shows a button that opens the form in a popup” - and sets photo upload, the required fields, minimum and maximum text length and the success message. A reCAPTCHA v3 section below holds the site and secret keys and a score threshold slider.](/images/uploads/plugixa-testimonial/32443d4f0f7d2e55a93469926e38d162d8ae42ef.webp)
Place the shortcode
[plugixa_testimonial_form]
Or use inside a Gutenberg Shortcode block, a widget, or a PHP template:
<?php echo do_shortcode( '[plugixa_testimonial_form]' ); ?>
Display modes
Inline
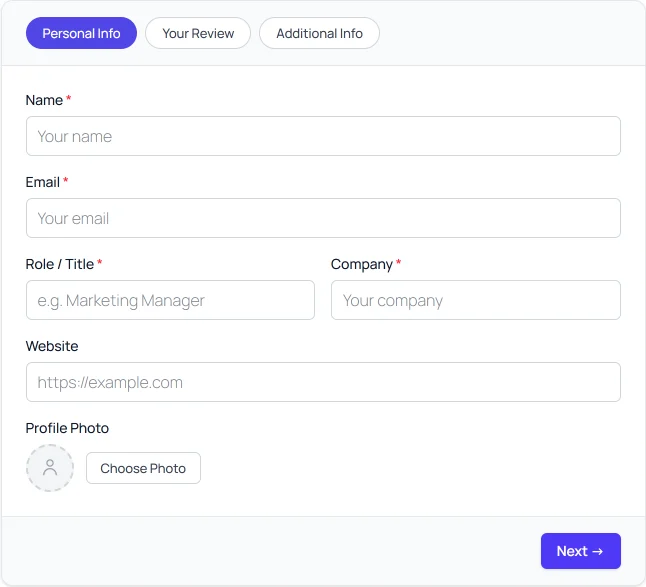
Form renders directly on the page. All fields immediately visible, card layout with pill-button tabs for logical grouping.
[plugixa_testimonial_form form_style="inline"]
Use when the form is the primary content of the page (e.g., a dedicated “Share Your Testimonial” page).
Modal
A button is rendered on the page. Clicking opens a modal dialog containing the form.
[plugixa_testimonial_form form_style="modal" button_text="Share Your Experience"]
The modal:
- Uses a two-layer structure: fixed backdrop (
z-index: 99998) + scrollable centering container (z-index: 99999,overflow-y: auto). - White rounded panel
max-w-lgwith close X button. - Dismisses on Escape key, close button, or click outside (backdrop click).
- Locks body scroll while open.
- Auto-closes on successful submission.
Use when you want to offer submissions alongside other content without taking up page space.

Form fields
| Field | Type | Default required | Notes |
|---|---|---|---|
| Client Name | Text | ✓ | Required by default. |
| ✓ | Required. Stored in meta table under submitter_email key. |
||
| Role / Position | Text | - | Optional. |
| Company | Text | - | Optional. |
| Website URL | URL | - | Validated format. |
| Testimonial Text | Textarea | ✓ | Required. Char counter shown. |
| Rating | Star selector | - | Interactive 1–5 star rating. |
| Photo | File upload | - | Drag-and-drop style UI. Validated against max_photo_size + allowed_photo_types. |
| Custom fields | Varies | Varies | Fields with show_in_frontend = true. See Custom Fields. |
Submissions default to pending status (configurable in Settings → Submission → Default Status).
Field validation
All fields use real-time validation:
- On blur - the
FormValidatorclass validates each field as the user moves away. - On input - errors clear as the user types (if previously shown).
- On tab change (modal or multi-tab forms) - per-tab validation before advancing.
- On submit - server-side validation; per-field errors are mapped back to the correct field.
Required, email, URL, number, and text-length validations are built in. Inline red border + error message appears under invalid fields.
Client-side validation is a UX aid - server-side validation is authoritative.
Photo upload
When photo_upload_enabled is on in settings:
- A custom drag-and-drop area appears (dashed border, SVG upload icon, helper text).
- Hidden
<input type="file">overlay catches drops and clicks. - On file select,
FileReadergenerates an instant preview (.has-previewclass swap). - Submissions with a photo use
multipart/form-data; without a photo they use JSON.
Server-side checks
- File type - must match the
allowed_photo_typessetting (JPEG/PNG/GIF/WebP). - File size - must be ≤
max_photo_sizeMB (default 2 MB). - Uses
media_handle_upload()to create a WordPress Media Library attachment. - Stores the resulting attachment ID as
client_photo_idon the testimonial.
reCAPTCHA
Two versions are supported:
| Version | Type | Description |
|---|---|---|
| v2 Checkbox | Visible | “I’m not a robot” checkbox. User clicks before submit. |
| v3 Invisible | Invisible | Runs in the background; returns a score 0.0–1.0. No interaction required. |
Setup
- Register your site at Google reCAPTCHA admin.
- Pick v2 or v3.
- Copy the Site Key and Secret Key.
- In Plugixa Testimonial → Settings → Submission:
- Toggle Enable reCAPTCHA on.
- Select the reCAPTCHA Version.
- Paste the keys.
- For v3, set the Score Threshold (default
0.5- submissions scoring below this are rejected).
- Save.
Testing
- v2 - visit a page with the form, verify the checkbox appears, complete and submit.
- v3 - submit the form; verify success without visible reCAPTCHA UI. The v3 badge may appear in a corner.
If submissions fail:
- The site key matches the reCAPTCHA version (v2 keys don’t work with v3 and vice versa).
- Your domain is registered in the reCAPTCHA admin.
- The secret key is correct.
Approval workflow
- Submission - visitor fills out and submits.
- Validation - required fields, reCAPTCHA, photo type/size.
- Storage - saved with
default_submission_status(usuallypending). - Notification - if
notification_enabledin Settings → Notifications, admin email sent. - Confirmation - the configured success message renders (with a success animation for 1.5 seconds).
- Review - admin reviews in Plugixa Testimonial → Testimonials filtered by Pending.
- Approval or rejection - admin sets status to
approved(makes it live) orrejected.
Changing the default submission status
In Settings → Submission → Default Status:
pending(recommended) - requires manual approval.draft- saved but hidden; requires status change to approved.approved- immediately visible on the frontend. Use only if you trust all submitters.
Multilingual passthrough
When WPML or Polylang is active:
- The submission form automatically sends the current site language as
language_codeon submit. - The new testimonial is created with that language_code.
- No UI change needed - the JS form reads the language from the page.
See Multilingual.
Testimonial request links
When a testimonial request link is visited (e.g., /share-testimonial/?pxt_request_token=...):
- The submission form detects the token via URL query parameter.
- Validates the token via REST API.
- Pre-fills the name and email fields from the request record.
- On submit, the request status changes from
pendingtosubmittedand links to the created testimonial.
See Testimonial Requests.
Success animation
On successful submission, the form:
- Shows a green success message with the configured thank-you text.
- Adds a brief success animation (1.5-second transition).
- Resets the form fields to blank (for inline mode) or auto-closes (for modal mode).
Custom fields on the form
Pro custom fields with show_in_frontend = true appear automatically in the submission form, rendered by field type:
text/email/url/number/date- native input types.textarea- multiline.select- dropdown with defined options.checkbox- option groups.color- color picker.
Validation and required-field enforcement apply per-field.
See Custom Fields.
REST endpoint
The form submits to:
POST /wp-json/plugixatestimonial/v1/frontend/submit
Content-Type: application/json   (or multipart/form-data when a photo is attached)

{
  "client_name": "Jane",
  "client_role": "CEO",
  "client_company": "Acme",
  "testimonial_text": "...",
  "rating": 5,
  "submitter_email": "[email protected]",
  "website_url": "https://...",
  "custom_fields": { ... },
  "language_code": "en",
  "pxt_request_token": "...",
  "g-recaptcha-response": "..."
}
Response is JSON with per-field validation errors on failure.
Troubleshooting
Form renders but doesn’t submit
- Check browser console for JS errors.
- Verify
submission_enabledis on. - Test with other plugins deactivated to rule out conflicts.
“reCAPTCHA verification failed”
- Site key and secret key match the selected version.
- Domain is registered with Google reCAPTCHA.
- For v3, try lowering the score threshold to
0.3if legitimate users are being blocked.
Photo upload fails
- File size ≤
max_photo_sizeMB (default 2 MB). - File type in
allowed_photo_typeslist. - PHP
upload_max_filesizeandpost_max_sizeare high enough.
Modal opens but doesn’t close
- Check for JS errors in the browser console.
- Verify the modal trigger button has the class
pxt-custom-open-modal-btn.
Related
- Shortcodes -
[plugixa_testimonial_form]attributes - Testimonial Requests - email-based submissions
- Custom Fields
- Settings → Submission - Submission tab