

Contents
Getting started - Plugixa Chauffeur
This page takes you from installing the plugin to seeing your first test booking in the admin. It takes about ten minutes and needs no payment account.
Install
From a ZIP
- In wp-admin, go to Plugins -> Add New -> Upload Plugin.
- Choose the plugin ZIP and install it.
- Activate.
By hand
Upload the plugixa-chauffeur folder to /wp-content/plugins/, then activate
it from Plugins.
Requirements
- WordPress 6.5 or higher
- PHP 8.2 or higher
The plugin uses Freemius for licensing and updates. See Privacy and uninstall for what is and is not sent.
What activation does
- Creates the plugin’s own database tables. Bookings, booking forms, vehicles, vehicle types and locations each have one.
- Gives the Administrator role the plugin’s permissions, including the one that opens the admin screen. No other role gets access.
- Stores the default settings: currency
USD, distance unit km, Cash to the driver and Pay on pickup switched on, Bank transfer and Stripe switched off, and booking emails switched on. - Stores the default availability rules, switched off.
It does not create any sample vehicle, booking form or page. A new site starts empty.
Where the menu is
Open Plugixa Chauffeur in the WordPress admin menu. It is a single top-level item with no submenus.
Every screen lives inside that one page. The screens are listed in a sidebar on the left, grouped under headings:
| Group | Screens |
|---|---|
| Overview | Dashboard |
| Bookings | Bookings, Calendar, Booking Forms, Availability |
| Fleet | Vehicles, Vehicle Types, Drivers PRO |
| Pricing | Locations, Pricing Rules PRO, Routes PRO |
| Insights | Reports PRO |
| Configuration | Settings |
The header carries a search box, labelled “Search bookings, vehicles, pages…”, that opens screens and finds records. Beside it are View site, a Dark mode switch, the Fullscreen switch, and an account menu with Exit to WordPress.
Finding your way around the admin
The sidebar and the header are the same on every screen.
The sidebar
The sidebar lists every screen under the group headings in the table above. It is shown in the normal view and in fullscreen. On a narrow screen, such as a phone, it is hidden behind a menu button at the left of the header.
Click a group heading to fold its screens away, and again to show them. The group that holds the screen you are on always stays open. Dashboard has no heading and is always visible.
Search and the command palette
Click the search box in the header, or press / on the keyboard, to open the
command palette. The / key opens it from anywhere in the admin except while
you are typing in a field or a dialog is open, where it types a slash as usual.
| You type | What is listed |
|---|---|
| Nothing | Every screen you can open, under Go to, in sidebar order with its group beside it. |
| One letter or more | The screens whose name contains what you typed. |
| Two letters or more | Records as well: up to six Bookings, six Vehicles and six Locations, listed above the screens. |
Records are matched as follows:
| Record | Matched on | Shown as |
|---|---|---|
| Bookings | Reference, customer name and customer email | The reference and the customer, the pickup address and the vehicle, and the status. Newest first. |
| Vehicles | Name and description | The name and the vehicle type. |
| Locations | Name and address | The name and the address. |
Move through the list with the up and down arrow keys, press Enter to open
the highlighted line, or click it. Esc closes the palette. When nothing
matches it reads “Nothing matches” followed by what you typed.
The palette lists Pro screens only when Pro is installed. It searches bookings, vehicles and locations: drivers, pricing rules, routes and booking forms are found from the search box of their own list.
Light and dark mode
The moon button in the header switches the whole admin to dark colours. It then becomes a sun that switches back. Until you press it, the admin follows the light or dark setting of your operating system. Once you have pressed it, your choice is kept.
The switch changes the plugin’s admin screens only. The booking wizard on your site and the WordPress menus around the plugin are not affected.
Fullscreen
Fullscreen, at the bottom of the sidebar and in the header, hides the
WordPress menu and toolbar so that the plugin fills the browser window. Exit
fullscreen brings them back. It is a view of the plugin, not the browser’s
own fullscreen mode: Esc does not leave it, and it is still on after a reload
and the next time you open the plugin.
Notices printed by WordPress or other plugins above the page are covered while fullscreen is on and visible again when you leave it.
The account menu
Your name at the right of the header opens a menu:
| Entry | Where it goes |
|---|---|
| Profile | Your WordPress profile page. |
| Account & license | Your licence account. Shown once the site is registered with Freemius. |
| Contact us | The support contact form. Shown once the site is registered with Freemius. |
| Upgrade to Pro | The upgrade page. Shown in the free edition only. |
| Exit to WordPress | The WordPress dashboard. |
| Log out | Signs you out of WordPress. |
The round badge shows the first letter of your name. The plugin does not load a Gravatar or any other remote picture. View site, in the header, opens your site’s home page in a new tab.
What is remembered
The colour mode, fullscreen and the folded sidebar groups are remembered in
your browser’s local storage, under keys that start with plugixa_chauffeur_.
They are kept per browser, not per user account: a second browser or a private
window starts from the defaults, and nothing about them is saved to the
WordPress database.
Your first booking
1 - Add a vehicle
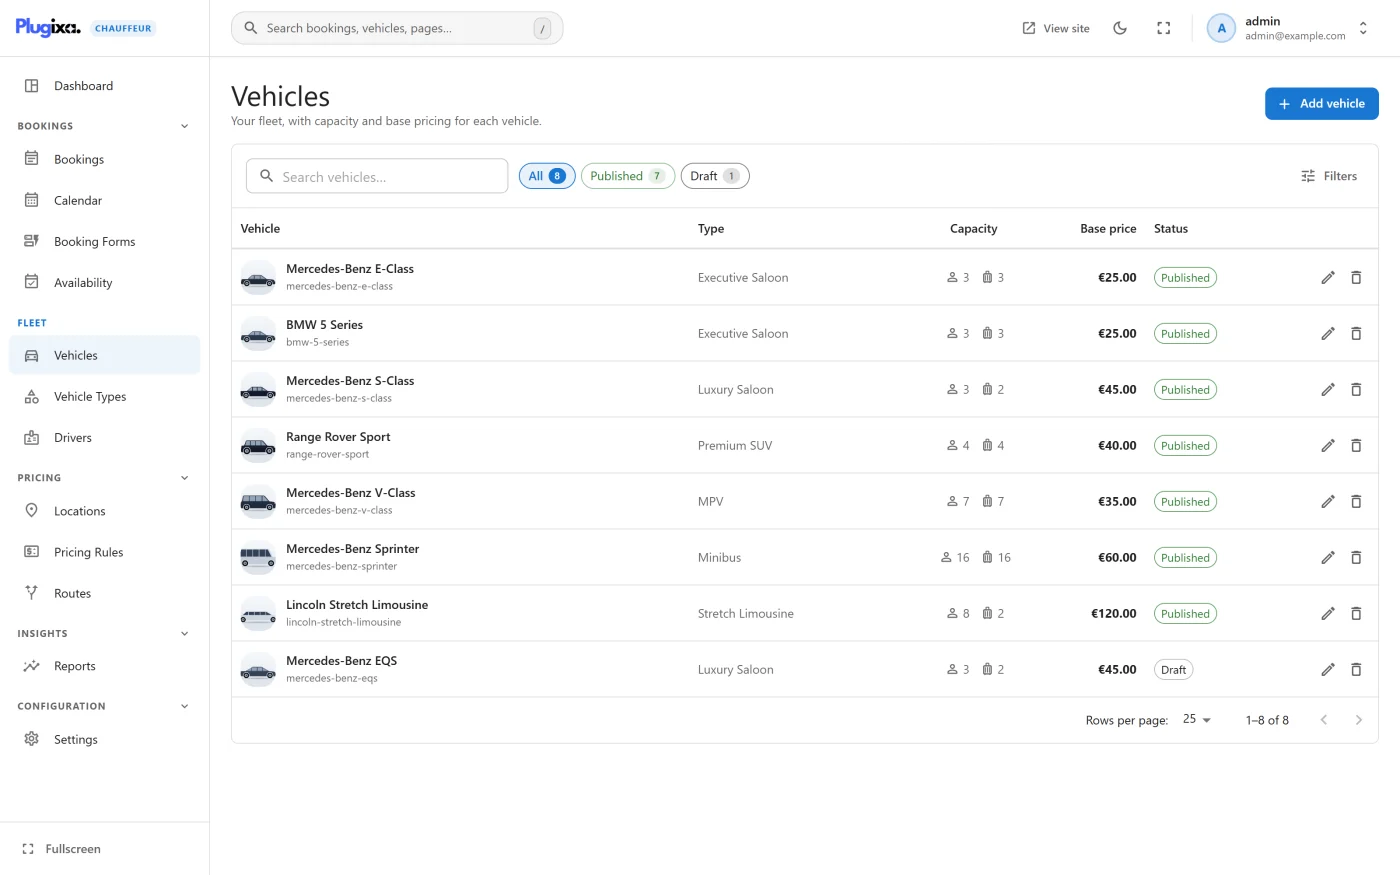
Go to Plugixa Chauffeur -> Vehicles and press Add vehicle.
- Enter a Name, for example Executive Sedan.
- Under Capacity, set Max passengers and Max luggage.
- Under Fares, enter a Base price, a price Per km and a price Per hour. Minimum price is optional.
- In the Visibility card, switch the vehicle to Published.
- Press Create vehicle.
A new vehicle starts as Draft. A draft vehicle is never shown to customers, so step 4 matters. See Vehicles.
2 - Create a booking form
Go to Plugixa Chauffeur -> Booking Forms and press Add booking form.
- Enter a Name.
- Leave Distance, Hourly and Return trips switched on.
- Leave the form Published and press Create booking form.
The form opens again with an Embed card on the right. It shows the shortcode, for example:
[plugixa_chauffeur_booking_form id="1"]
Press Copy shortcode. See Booking forms.
3 - Check how customers can pay
Go to Plugixa Chauffeur -> Settings -> Payments. Cash to the driver and Pay on pickup are already on, which is enough for a test. To take cards online, set up Stripe as described in Payments.
While you are in Settings, set your Currency under General.
4 - Put the form on a page
Create a page, add a Shortcode block, paste the shortcode and publish the page. See Blocks and Shortcodes.
5 - Make a test booking
Open the page as a visitor would.
- On Trip, enter a pickup location, a drop-off location, an estimated distance, and a pickup time at least an hour ahead. Press Continue.
- On Choose a vehicle, click your vehicle. Its price is shown on the right. Press Continue.
- On Your details, enter a name and an email address. Press Continue.
- On Review & confirm, choose a payment method and press Confirm booking.
The wizard shows “Thank you! Your booking is received.” with a reference such
as PXC-20261002-0421. See
Booking wizard for every
step in detail.
6 - See it in the admin
Go to Plugixa Chauffeur -> Bookings. The booking is at the top with the status Pending. Click it to open the detail screen, change Booking status to Processing and press Save changes. The customer is sent an email headed “Your booking is confirmed”.
If email is working on your site, two more messages were sent when the booking was made: a confirmation to the customer and a notification to the site admin address. See Emails.
Letting someone else manage bookings
Only administrators have access after activation. The admin screen and its data
are protected by the capability plugixa_chauffeur_manage, and deleting records
also needs plugixa_chauffeur_delete. Grant those to another role with a role
editor plugin to let its holders manage bookings without being administrators.
The Settings screen always needs an administrator. Developers can change
the capability names with filters, see
Hooks Reference.
What to do next
- Group your fleet in Vehicle types.
- Understand the numbers in Pricing.
- Set opening hours and closed days in Availability.
- Take card payments with Payments.
- Learn the daily screens in Bookings and Calendar.