

Contents
On this page
- Requirements
- 1. Install and activate
- What activation does
- 2. Set your currency and formats
- 3. Make the marina your own
- 4. Set up your boats
- 5. Check the location's Booking setup
- 6. Check how customers pay
- 7. Put the booking form on a page
- 8. Choose your pages
- 9. Take a test booking
- If no boat shows as available
- What to do next
Getting started - Plugixa Boat Rental
This page takes you from a fresh install to a first booking made through your own website. It takes about fifteen minutes. Each step links to the page that covers it in full.
Requirements
- WordPress 6.5 or higher
- PHP 8.2 or higher
- The WordPress REST API reachable by visitors who are not signed in. The booking form talks to your site through it.
WooCommerce is not needed. With Pro it can be used as the checkout, see WooCommerce checkout.
1. Install and activate
- In WordPress go to Plugins -> Add New -> Upload Plugin.
- Choose the ZIP file and click Install Now.
- Click Activate.
Pro comes as its own ZIP file and is installed the same way.
A new item, Plugixa Boat Rental, appears in the WordPress menu. Everything in the plugin is inside it: one admin app with its own sidebar, opening on the Dashboard.
What activation does
- Creates the plugin’s own database tables and saves the default settings.
- Gives the plugin’s permissions to the Administrator role.
- Adds starter content, so the booking form works before you have typed anything:
- a marina called Main Marina, open around the clock every day;
- three demo boats, one for each booking mode: Jet Ski 1100 (free duration, 80 per hour, 1 to 4 hours in 30-minute steps), Sunset Cruise Catamaran (fixed departures at 09:00 to 13:00 and 17:00 to 20:00, 450 per departure) and Day Boat 6m (full day, 220 per day);
- eight boat categories: Motorboat, RIB, Sailboat, Catamaran, Yacht, Pontoon, Jet ski and Kayak / SUP;
- a booking form called Default Booking Form.
Starter content is added on activation only. An update never puts back something you deleted. Activation does not create any WordPress pages.
2. Set your currency and formats
The currency starts as US dollars. Open Plugixa Boat Rental -> Settings -> General. Under Currency, set the Currency code (such as EUR), the Currency symbol, the Symbol position and the Decimal places. Under Dates and times set the date and time formats and Week starts on. Under Units, Length unit chooses metres or feet for new boats.
Set the currency before you enter prices. Changing it later does not convert amounts already entered. See Settings.
3. Make the marina your own
Open Locations in the Marinas section of the sidebar and edit Main Marina. Give it your name, address, timezone and opening hours. Add a latitude and longitude if you want it on the marina map.
Every time in the plugin is read on the marina’s own clock, so set the Timezone if the marina is not in the site’s timezone. See Locations.
4. Set up your boats
- Boat categories (optional). Rename, add, reorder or switch off categories.
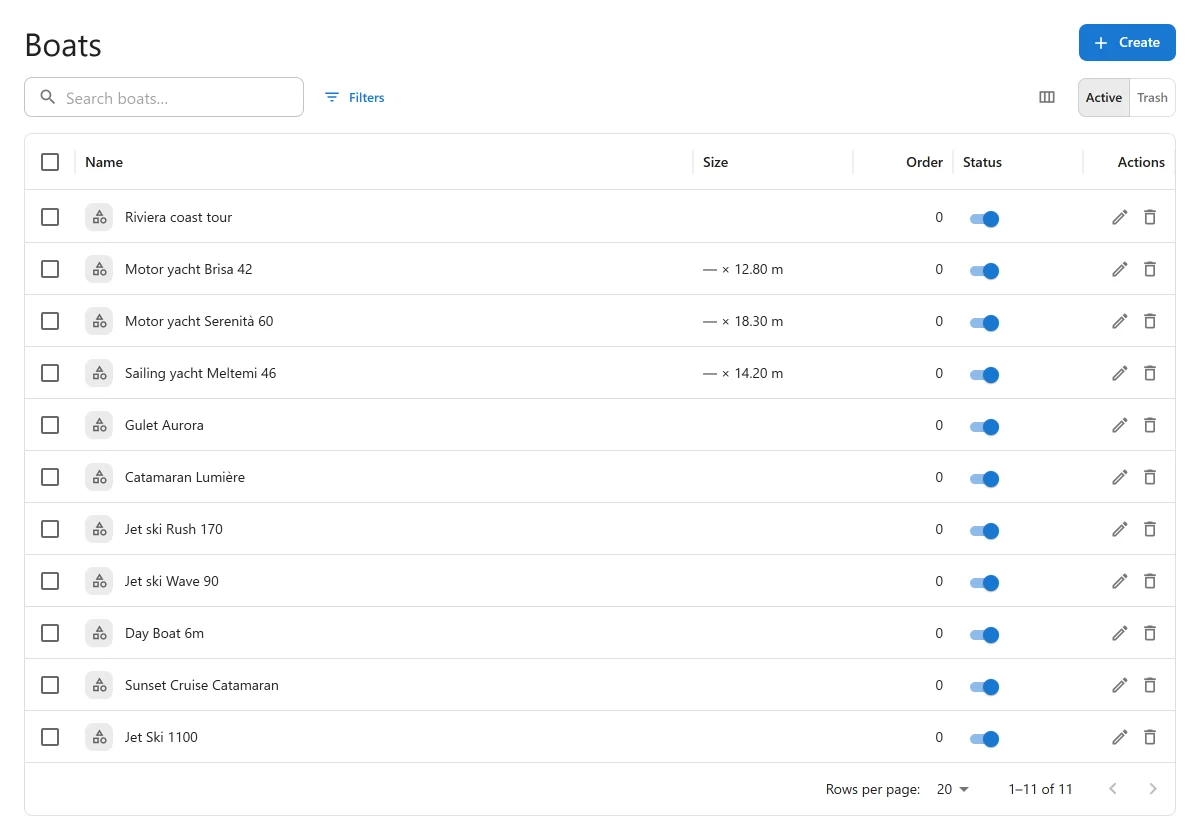
- Boats. Edit the three demo boats or add your own with New boat. Give each one a Type, a Marina, the number of Guests it carries and a Booking mode.
- Prices. Save the boat, then fill in the Prices panel. A boat needs a price for the unit it is Priced in, or customers cannot book it.
A boat can only be booked at its Marina. A boat with no marina cannot be booked at all. See Boats, Units and Booking modes.
5. Check the location’s Booking setup
Open the location again. The Booking setup panel on its edit page lists every boat kept there and says whether customers can book it: OK, Boat switched off, or a warning that the boat has no price. Under it, Forms that offer this location lists the booking forms that book there. Fix anything it flags before you go on.
6. Check how customers pay
The free plugin has one payment method, Pay on arrival. Write what the customer should know, for example bank transfer details, under Settings -> Payments -> Instructions for the customer. See Payments.
With Pro you can also take payments online through Stripe PRO, PayPal PRO and Mollie, Adyen and Klarna PRO.
7. Put the booking form on a page
-
Create a page, for example “Book a boat”.
-
In the block editor, add the Boat Rental Booking Form block. In the classic editor, or anywhere shortcodes work, add:
[plugixa_boat_rental] -
Publish the page and link to it from your menu.
Then create a second page for the booking summary with the
[plugixa_boat_rental_summary] shortcode. This is the page a customer’s booking link
opens. See Shortcodes and blocks
and, if you build with Elementor, Elementor widgets.
8. Choose your pages
Open Settings -> Bookings -> Pages:
| Setting | What to choose |
|---|---|
| Booking page | Where a customer lands after paying online. Left empty, the booking summary page is used, or a page that holds the booking form. |
| Booking summary page | The page with [plugixa_boat_rental_summary]. Emails link to it. Left empty, no link is sent. |
9. Take a test booking
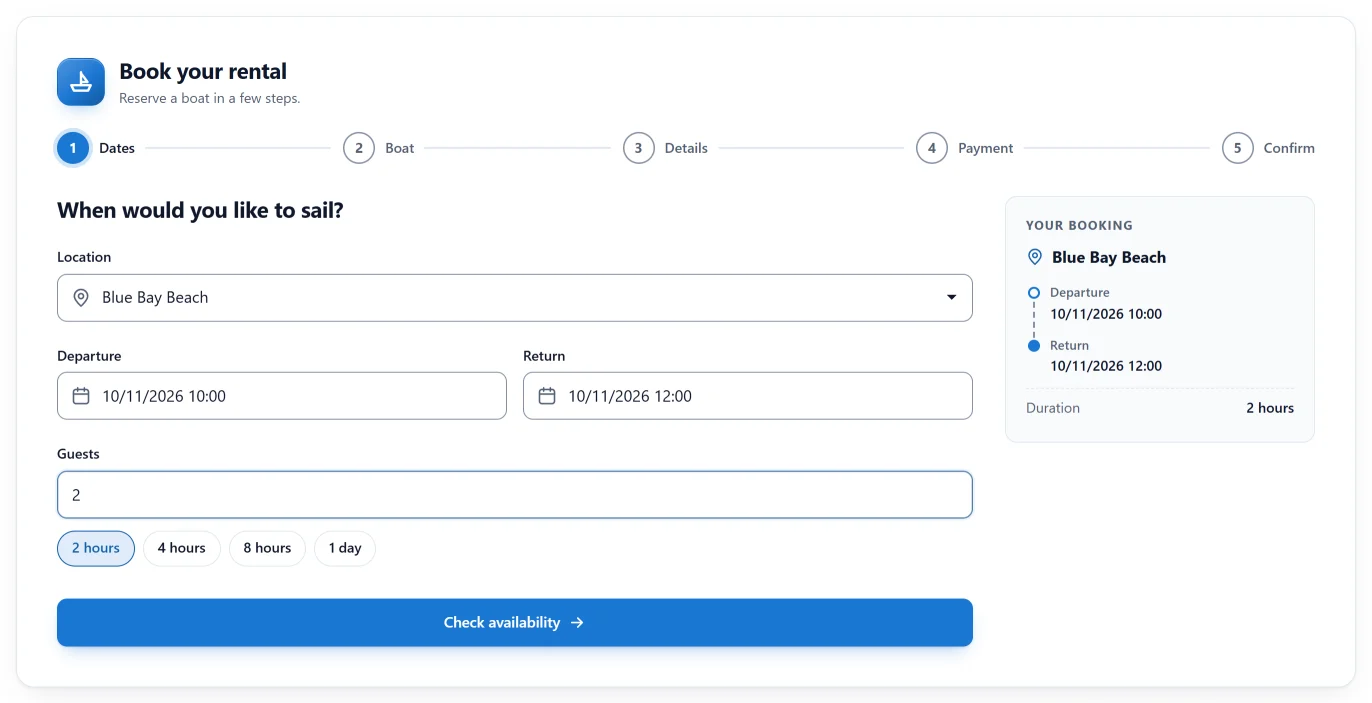
- Open your booking page in a private browser window, so you see what a visitor sees.
- Choose the departure, the return and the number of guests, and click Check availability.
- Choose a boat and click Continue.
- Fill in a name and an email address you can read, and click Review.
- Check the summary and click Confirm booking.
- Note the reference on the last screen.
Back in the admin, open Bookings. Your test booking is at the top. New bookings start as Pending unless you change Status of a new booking under Settings -> Bookings. The confirmation email, with a calendar file attached, is in the inbox you used. See Booking forms for each step of the form in detail, and Bookings for the list.
The reference starts with BOAT-. Change it under Reference prefix in Settings ->
Bookings.
If no boat shows as available
| Check | Where |
|---|---|
| The boat is Active and has a Marina. | Boats |
| The boat has a price for the unit it is Priced in, at that marina or for all locations. | Boats |
| The booking form offers that location and that boat. | Booking forms |
| The marina is open at the departure and the return, and is not closed that day. | Locations |
| The rental fits the boat’s rules: the minimum and maximum hours and the step, one of its departures, or one full day. | Booking modes |
| The number of guests is not more than the boat carries. | Boats |
| The departure is within Shortest notice and Furthest ahead in Settings -> Bookings. | Settings |
The form lists the boats it left out under the ones it offers, each with the reason, so start there.
What to do next
- Review the emails customers receive.
- Give your boats photos and an On board list for their public pages: Boat pages, search and the boat grid.
- Switch off what you do not use in the App manager.
- See what Pro adds: Free vs Pro.
Quick Links
Share